Saturday, March 31, 2018

Bars 3 Quilt Off to a Forever Home

Technically I should have finished Bars 1 first but these small quilts are much easier to carry back and forth. They fit into my minuscule bits of free time. Because most of the tops were sewed {for the demo that didn't happen} I can sew a few quilting lines at a time without worrying where I was in the process. There is less fabric to wrangle under the machine arm.

Bars 3 uses the last of the pastel strips with whites, this time alternating with whites and very light tints.

Bars 3 quilt

A friend of my grandchildren will have a baby sister soon. Gifting each child with a quilt seems more welcoming and inclusive so I'm sending the two small Bars quilts to them.

Binding and quilting Bars 3 

They both have similar straight line walking foot quilting. After writing about "halving the quilting lines" several times, I finally remembered to snap some photos.

Quilting by "halving the space" with a walking foot

This one is bound with the same stripe as her sister's. It first appeared in Strippy Nine Patch, then became a binding on Spiderweb 3. It's a treat to use these beautiful fabrics and use them up. Pink was my mother's favorite color.

Quilt Details
Size: 39"" x 43"
Design: Chinese Coin
Batting: Mountain Mist Blue Ribbon 100% cotton
Thread: white Gutermann sewing weight cotton
Quilting: Straight lines with walking foot


Enjoy the day, Ann

Tuesday, March 27, 2018

Scale and AHIQ 31

It's going to be a hard year again for our family with many decisions to make. After a month of non-stop sorting I realized everyone needs a weekend. Like any full-time employee Monday through Friday will now be spent clearing out the house and estate. Weekends are free to sleep in, read, quilt, visit, recharge. Putting this plan into practice, I attended the Dallas Quilt Show followed by dinner with my favorite nieces. When I lived in the area I was a member of this guild {and also a program chair - my perennial office.}

As a large show that offers cash prizes (winner's list here) it draws out-of-town and even out-of state artists. Several were prizewinners at other venues. For example, Cynthia England's Reflections of Cape Town was the Best of Show at 2016 IQA in Houston but was much easier to see here since we could spend more time up close {and frankly, in better light.}

Reflections of Cape Town by Cynthia England

There were many beautiful quilts - both purchased patterns and original designs - but these attracted my attention for their use of scale.

Carol Morrissey abstracted a photo of her grandson with circles in a variety of colors and sizes. After spending a while here I believe the background is one solid grey fabric (with perhaps  a bit of texture painted on it). Carol created his face pointalist fashion by identifying the major portions of light and shadow. As always the beauty is in the details such as his chin, both ears, and the white highlight in his eyes.

Jake by Carol Morrissey

Using Carolyn Friedlander's Envelopes pattern, Rachel Kent incorporated letters to her father in Happy 60th, Mr. Postman to celebrate his milestone birthday. I assume she mailed prepared fabric to people who wrote a message on it. Did she mail special pens, too? Then it looks like she fitted their responses to different sized envelopes. Again, did she outline various boxes for people to stay within? All the replies are fairly "square." I'd have expected a few people to create long rectangles if they didn't understand the intended use.

Happy 60th, Mr. Postman
by Rachel Bryan Kent

Terry Mosher used varied the size of bars to create his Hippy Trippy Christmas based on a Kaffe Fassett design. Of course I see another Chinese Coin variation in this two-color medallion. {I see them everywhere now.}

Have a Hippy Trippy Christmas
by Terry Mosher

Red and green always make lovely quilts. Most of them are definitely seasonal. I think this one could be used year-round. It reminded me of my Watermelon quilt - a red, green, and black quilt that evokes hot summer days.

Enjoy the day, Ann

InLinkz removed because it was hacked.

Saturday, March 24, 2018

Adding Roses

Re-reading Freddy's Houses recently I was struck by this statement:

"When I start building a quilt I hate the way it looks. The blocks are jumbled, messy, and chaotic, and the design makes no sense. I force myself to keep going, keep designing, until eventually I see order emerging from the chaos: 10 colors don't work, but 100 colors do!" - Freddy Moran

Who'd have thought Freddy and I start our quilts the same way?

I dislike many of my quilts near the beginning. In fact, I've found over the years that the quilts I like at the halfway point are the ones I am usually disappointed with by the end while those I am dissatisfied with midway through end up much better. Perhaps because I redouble my efforts to "correct" the laggards but fail to pay enough attention to the ones that seem to be working. Something to consider.


Chinese Coins and Roses
My bright idea of appliqueing on top of coins didn't exactly happen. I constantly {or is it consistently?} revert to piecing when facing a challenge. Making the roses was great fun. Stopping the rounds was much harder. Since I didn't turn the rose frequently enough my petals got larger and larger which forced me to stop before they became ludicrously long. {I still think my roses have more of a pineapple block feel. Not complaining; just noting. Next time I'll establish a maximum petal length and turn the block more frequently.}

Once the leaves were in place, determining how to insert the roses into the quilt was the next step. I created extra Coin sheets then sewed them to the rose to square off the design.

Squaring up a rose
to fit into Chinese Coin columns

The next decision was how many columns to fill behind the rose. The first two roses were wider than any Coin column. In the original arrangement (which I forgot to photograph) they fit across three narrow columns but the best solution set them across two columns. The sides of the rose “block” only needed a bit of trimming. {I had no idea upon starting that the roses would become blocks to be set in.}

Sewing a rose block
into Chinese Coin columns

The larger roses were finished first. As I was working around the smallest one, I found the top needed different sizes. And then realized it fit into the widest column very well.

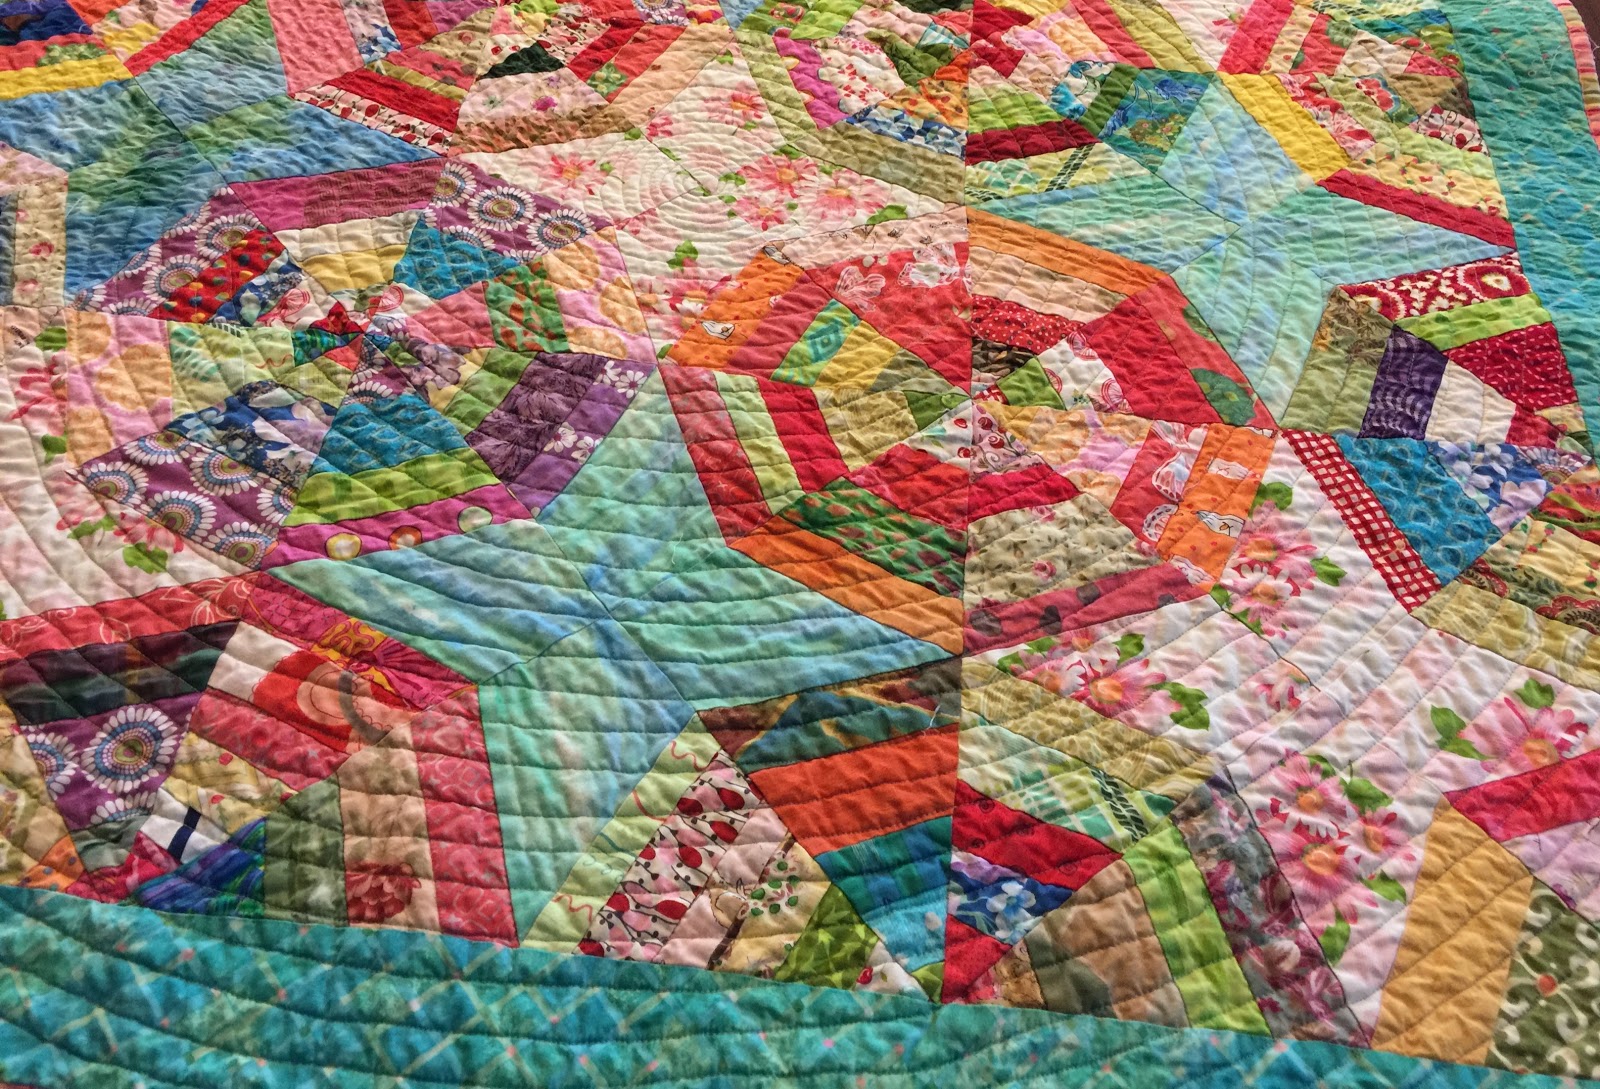
Chinese Coins quilt with roses

Putting a green column on the left evokes the leafy bushes. Those same greens didn’t work along the bottom. Instead I settled for mixing in extra green and grey coins. I also tried to make a soft border on the right by making small sets of alternating pairs of coins.

The quilt still doesn’t seem done but life is sad and crazy now. It’s better to wait and think. The top right is a lot of open space but adding a sun or bird isn’t the answer. Perhaps a vine connecting the roses? Or another rose near the bottom pair?  Or trimming the quilt down a bit? Any vine should be chunky with lots of leaves.

Enjoy the day, Ann

Tuesday, March 20, 2018

Attempting Applique

Chinese Coins VIII began as a value study for the demonstration I planned to give to my guild earlier this year when life intervened. Originally these columns were to be combined with light yellow columns and dark green/blue columns; that is, until I saw all of these soft blue/greens together. They make a perfect background for appliqued vines so I set them aside for a while.

Chinese Coins VIII quilt background

Especially after working with Circular Anomaly, I knew strong reds would play well with these turquoise shades. Red reminded me of roses but I had reservations about making applique as large as seemed to be needed. At that point I remembered the pieced roses that were so popular a few years ago which always reminded me of crazy quilts and irregular pineapple block. IMO some of the prettiest were made by Tim Russell; I spent a while soaking in ideas from his roses.

QS and I took a crazy quilting class years ago. The teacher {whose name I've forgotten} suggested beginning with pentagons so I made one for the centers of these flowers and then continued around like a log cabin. I wish I'd trimmed the petals more like Tom's; mine got larger and larger as I went around. Still, they look alright.


The next step was determining where to add leaves. You can see my first large leaf on the left of the lower rose in the photo above. Eventually I sewed a smaller dark green triangle on the left. Being a bit unhappy with how it looked, I only pinned the one on the right. Too dark and heavy.

Auditioning dark green leaves near the rose

The odd white with large dark leaves gives hints of leaves in the distance but keeps the rest of the background light. Only a light blue-green triangle needed here.

Auditioning light background instead of dark leaf near the rose

That's how my attempt at applique turned into piecing. Sigh. Now to add more roses.

Enjoy the day, Ann

Saturday, March 17, 2018

Inspiration Strikes

Happy St. Patrick's Day.

Pin basting several quilts at the same time has worked for me lately. So what the heck. I pinned the small medallion from last year (CCIV) that has been waiting to-be-quilted for several months - perhaps a year - at the same time as CCVII. And it sat again.

The continual problem? It looks unfinished. Of course, it is unquilted... but I mean the top itself. I've never been satisfied with this quilt. The center is chopped off. There's absolutely no more fabric so Sue Kelly's suggestion to broderie perse some elements from it wouldn't work. That's why it rested in the UFO pile for so long.

As soon as it was pinned though, inspiration struck because of that chopped-off white flower. {I would say, "Isn't that always the case?" but unfortunately, inspiration frequently strikes me after everything is done. A day late and a dollar short as it were.} What if I extended the flower with solid white fabric? And what if I scattered a few more flowers about?

I cut some mockups from paper. Looking good so far.

Potential flowers added to
medallion Chinese Coin quilt

After preparing solid fabrics and letting them dry overnight, I cut the shapes out and pinned them on the top. The next problem is that the quilt is pinned and trimmed fairly close. Two choices: machine stitch through all the layers or judiciously unpin a small portion. To be even safer, I stitched the flower closest to the edge of the quilt.

Machine appliqueing a flower onto a quilt

I took the table off the machine so I'm sewing by inserting machine arm between the top and the batting-and-backing. Not an ideal situation but it works. The small arm fits without removing too many pins.

Starting at the center, without the orange star portion, I outlined petals. With the needle down on the outside edge, I put the star in place before outline stitching over it. Then I went around that shape again, a bit inside the first and ended with some circles for the very center. Now the outside edge didn't look uniform so I traveled back and went around again... deliberately very casually.  The hardest part actually was tying and burying the threads.

Flowers are machine appliqueing onto a quilt

I thought this would take a day or more to finish but it took less than an hour {after the material was prepped.} In fact, cutting the shapes out took longer than sewing them on. While it would look better done before basting, it turned out pretty well.

Now to choose a quilting design and thread color.

Enjoy the day, Ann

Tuesday, March 13, 2018

Pi Day 2018

Ok, so Pi Day is tomorrow - 3/14 - but I couldn't wait.

I've been wanting to make a Wagon Wheel or Ferris Wheel block for several years, simply haven't gotten around to it. The joy and bane of rotary tools is that they make straight cutting so easy.

The 10-degree wedge ruler was a find at a quilt show... about three years ago. {It had to age on my bookshelf, you know.} When I was finally ready to start, I considered using bright fabrics but have a collection of oddly colored green, beige, red, and white fabrics sitting unused in my stash. Hmm.

Wedge ruler and fabric pull for Ferris Wheel blocks

So I made a sample that turned out to be a mess. Granted, I extended the ends of the ruler in both directions by adding my regular ruler but the wedges are disconcertingly inaccurate. Into the Future Box it went. {Doesn't that sound better than UFO? Like a Hope Chest, perhaps?}

First Wheel

Rod Kiracofe showed a Wheel quilt at a recent lecture with Julie Silber that has similarities with my original plan. The varying blade widths are attractive here.

Julie Silber holds a Wheel quilt
from Rod Kiracofe's collection

On the drive home I remembered Audrey's quilt with striped binding. Red and white striped binding. And I have some red and white stripe fabric. I pulled everything out again adding a random grey-green solid for a background. {I'd forgotten she put quarter circles on her quilt.} Possibilities.

Quarter Ferris wheel block
with red and white striped binding

This was the last photo I snapped before leaving on the family emergency so there's no telling when I will get back to it or how it may change. Well, it's been in the Future Box before.

What other circles have I made this past year? Well, I finished the Thirty Year Sampler

Thirty Year Sampler quilt

and Rabbit 1.

Rabbit 1, a Strips 'n Curves variation

Pluto and the moon on these Christmas stockings,

Velveteen Christmas stockings for grandchildren

the Racetrack quilt,

Racetrack quilt
Circular Anomaly {which isn't finished},

Circular Anomaly quilt in progress

and the Propeller baby quilt {which is still basted but not quilted.}

Start Your Engines propeller baby quilt basted

Not a bad collection of Pi(e)s. Off to make an apple pie. Lots of family around so it will be gone before it's cooled. Yum!

Enjoy the day, Ann

Saturday, March 10, 2018

Rabbit 2 Top Finished

Using the absolutely last of the Strips 'n Curves fabric, I finished this top while DH worked late last year. Then the "demo that didn't occur" took over so I hadn't posted it. Again I only used the Negative/Positive template set. It has an '80s vibe but a child might like to race his cars or horses, build a city or irrigate farmland on this quilt. It is open to the imagination.

Yellow/green Strips n' Curves quilt top sewn

I love some of the subtle changes from one curved area to the next in this Rob Peter to Pay Paul variation. Amazingly the strips lined up well. Only a couple of seams didn't match up at all. I'm not sure why but I'm not going to worry about it.

Once the blocks were sewn, this top took another three days to put together. After the strip sheets of fabric were created, I didn't press anything again until it was all together. Then I carefully used up/down motion only with the iron; no back/forth movement at all. All the outer edges are bias cuts so it definitely needs a border. Probably very narrow, just to stabilize those edges.

DIL has requested this quilt for a friend. Done deal. Just need to quilt and bind it.

Enjoy the day,
Ann

Tuesday, March 6, 2018

Spiderweb 3 Quilted and Gifted

The third spiderweb quilt, the one with the blue stars finished quickly once I decided on the spiral quilting design.

Spiderweb quilt with blue stars

Nothing but parallel or echo quilting will show on all these busy prints. Plus I expect the quilt to receive constant use.

I started the spiral a bit too close but like it anyway.

Starting the spiral quilting

Even better, this time there are no waves on the edges. I quilted more slowly {although it only took the afternoon} and made sure to not pull the quilt on the bias. Success. Previous spiral result here.

The circles aren't perfect but I think the stitch length is a bit more uniform.

Spiral quilting on Spiderweb quilt

Because of all the bias edges, this top did not pin as flat as most of mine. Choosing a quilting design without crossing lines always helps scoot those bubbly areas into the quilt without tucks. Think this spiral, echo quilting or {best of all} meander or stipple quilting. Parallel quilting lines may be okay or may simply "push" the excess along a create bias stretch waves between rows of quilting.

Due to bias edges on the blocks,
the top of this quilt is not flat.

The back is a single fabric remnant and the binding is almost the last of the pink and green stripe used in Strippy Nine Patch border and Bars 2 binding.  And there's still some left in the binding box. Always a joy to have binding ready at hand.

Binding and backing on Spiderweb quilt

Previous posts:
  1. Starting with leftovers from previous spiderweb
  2. Changing the border
Quilt Details
Size: 40.5"" x 40.5"
Design: Spiderweb 
Batting: Mountain Mist Blue Ribbon100% cotton
Thread: Aqua Aurifil cotton 50/2 thread
Quilting: Free motion spiral 

Spirals remind me of circles which remind me of Dale Fleming's method for making circles. It looks like applique although it's pieced. Instructions were on an old Simply Quilts episode that Patty mentioned a while ago. She used it to mend a quilt of vintage wool; I used it to mend a hole in this quilt.

Circular mend in a palm tree

The technique inspires me to consider making more Quilty365 blocks. Those are on my to-do list this year.

Enjoy the day, Ann

Saturday, March 3, 2018

Bars 2 Quilted

This quilt went together very quickly because many of the strips sets were already made (leftover from the Bars quilt top.) Quilting roughly parallel lines with a walking foot is a perfect utilitarian finish that only takes a couple of hours on a small quilt.

Bars 2 baby quilt in pastel solid fabrics

Although the quilt was small enough to fit on WOF, I used two pink fabrics to get enough length for the back. Most of the chevron was the back for this t-shirt quilt. Only a few narrow lengths remain.

The binding is a remnant of the pink and green stripe originally used in the ribbon border of my Strippy Nine Patch. What a lucky find. It segues nicely between the solid front and printed back. I also used it on the recent Spiderweb quilt... and there's still a bit more. Perhaps enough to go around another quilt or two. Into the binding bin it goes.

Back, binding, and quilting on Bars baby quilt

Again I quilted simple unmarked parallel lines like Fifth Chinese Coins but these run across the Coins/Bars and are about an inch apart. It should keep the seams from pulling and still keep the quilt flexible and soft for a baby.

Previous posts:
  1. Designing Bars 2.
  2. Bars 1 workshop.
  3. Sewing Bars 1 top.

Quilt Details
Size: 38" x 38"
Design: Chinese Coin
Batting: Mountain Mist Blue Ribbon 100% cotton
Thread: pink Metler cotton 50/3 sewing weight
Quilting: Straight lines with walking foot

Enjoy the day, Ann