Tuesday, February 28, 2017

AHIQChineseCoins and AHIQ #18

Can you believe it's been a month since we started #AHIQInvitational?

Originally I called this a challenge but there are enough challenges of every sort in the world right now. So, let's call it something friendlier and more inclusive: an open invitation. For the first quarter of 2017 we hope you'll explore at least one variation of the Chinese Coin design. If this is your first visit, refer to the inaugural post here.

I've been working on a Chinese Coin quilt that will be a housewarming present to my niece. As usual, it's a learning opportunity. There are many variations but I felt she would prefer something quiet and restrained. Her colors are light blue, yellow, grey, and white. {Not my typical style. Not my personal choice of colors. A good challenge on many levels.}

In keeping with a quieter quilt, I used a striped effect. Each column was originally composed of a single pair of blue, yellow, grey or white fabrics pulled from my stash. When those ran out, I took strips from the scrap bag. For the final column (far left) I snapped this photo to help decide between the two lights. The top light is too beige so I used the cream with yellow poppies on bottom.

Columns of Chinese Coins ready to arrange

Once the columns were done I had to work out the order and decide whether or not to add sashing. Here are some of the fabrics I tested. The only one that seemed to add anything to the conversation was a dark grey hand-dyed remnant from Jonathan Shannon. Since that has only enough for one or two sashings, this quilt won't have any.
Some possible sashing choices for Chinese Coins

Moving the blue columns further apart while keeping the soft columns on the outside looks better. Although this top was ready to layer and baste, I realized I'd never shown some of the strip sets that were discarded. 
I thought this top was done

All I did was  position a few strip sets on top for a quick comparison. One is the yellow and brown plaid with floral while the other two were still lurking in the scrap bag.
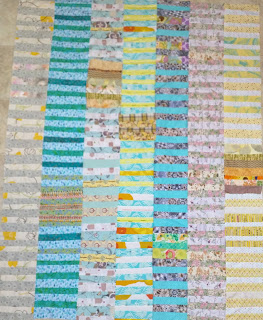
Chinese Coins quilt top
with darker sections laid on it

They are too dark and dull but made me realize I like the way these block sets break up the long columns. Once they were taken off, the quilt looked awkward. Trying to use good art principles, I positioned variations a quarter or third of the way in rather than at the midpoint. But a good plan for a single column makes a problem when several a sewn together. The middle has a "bare" look and the darker blue column on the left and this middle column change colors at the same point.

I also noticed I sewed the right-hand blue column upside down.  {If I'd sewed that correctly it would have added more coin change variation.} Those seams were cut freehand so there's no turning it now.

After an hour playing with various strips {some of which were too short to use} I finally replaced one section of three. It's easier than it sounds. I unsewed the original trio, sewed a new set, pressed both, overlaid the original on the slightly larger new, and cut the new to fit that shape. No worrying about individual strips; it's the final size of the group that matters.

Replacing a section of one column

And here's the result. A very minor change: two whites substituted for two yellows in the middle. But it adds a bit of change in the middle of the columns.

Chinese Coins quilt top, final arrangement

That middle column still contains only three fabrics: blue, yellow and a Marimekko print. I've only reordered it a bit.

Value has been an object lesson for this quilt. Although they don't cover the entire spectrum, the quieter colors still need a range of values. Another discovery is that prints react differently with lower contrast colors. The grey and white column on the right and the yellow floral and plaids {that I excluded} are cases in point. As yardage these prints appear quite different but when sewed, they blended together more. Some were almost mushy. Value is more important than color.

Now I look forward to reading about your projects. Please include your current work, whether or not it's a Chinese Coins project. Everyone is welcome: beginners to experienced quilters. Over the past year we have noticed a wide diversity of construction techniques and specific areas of interest. It's not just a "photo op." Share what you've learned and join our exploration of improvisational and utility quilting.

Enjoy the day, Ann

InLinkz removed because it was hacked.
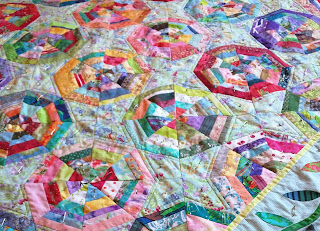
Saturday, February 25, 2017

Outlining the Stars

 I bordered the stars with straight stitching. Each star has its own stitching. Lots of threads to tie off.

Stars bordered with walking foot stitching
Here's the view from the back.

View of stitching from the back

Next step will be to fill in the spiderwebs and stars. I may use the same method for the spiderwebs as Suhavi's Stars but I'm thinking about different FMQ designs for the stars themselves.

I'm plugging away on the Sampler quilt. Someone suggested I fold and baste the edges to keep them from fraying and the batting from becoming dirty. 

Edges folded and basted to keep them tidy and clean

Given that this quilt is twenty-nine years old and still unfinished, that's the best advice I've ever been given!

Tuesday is our next AHIQ linkup. I have #AHIQChineseCoins to share. Do you?


See you then.

Enjoy the day, Ann

Tuesday, February 21, 2017

Polka Dot Quilt for a Great Debater

Sidetracked again... by another finish! Finishing quilts is a great way to clear out my sewing room and reduce my stash. It takes as much material as the front. At this rate there won't be many UFOs around here AND I'll have room for a few new purchases. {Nothing humble about this outright bragging.}

In case you hadn't noticed, boys are different than girls. :-) High drama always surrounded my daughter and her friends while the boys took most things in stride... until I made a fatal error.

As my offspring graduated high school and college I always made quilts for them and their best friends. So when my youngest finished college I made quilts for his two roommates as a matter of course. {Three quilts. Count 'em.} You'd have thought that was a sweet, considerate gesture. Wrong.

I knew the guys watched the games at his apartment but didn't realize part of the attraction was his quilt collection. Turns out they loved wrapping in those old quilts. Everyone had a favorite.

The arrival of two new quilts occasioned loud discussions of "who was most worthy." Each vociferously propounded his own opinion of who should have received a quilt based on
  1. closeness of their friendship, 
  2. length of time they'd known my son, 
  3. number of classes they'd taken together, 
  4. climate of their new homes, and probably even
  5. phases of the moon. 
What a ruckus. ROTFLOL. What else could I do? Here's the fourth quilt for the Great Debaters. {Two more to go.} It's my Polka Dot quilt from the Freddy Dot Com class. {Not quite FDC because I used a different template.}

Piano keys border in reds surround polka dot quilt.
Polka Dot quilt

Look. The piano keys border is a single column of Chinese Coins! It reminds me I need to get busy with that project.

The back mimics the front in a simpler fashion using up some more leftovers.

Back of Polka Dot quilt

One of Freddy Moran's quilts had large cobblestone circles. {I took a picture but seem to have deleted it. Not only can I not show it, I had to remember what I thought the quilting looked like.} Anyway the recent applique ideas reminded me because they all doubled stitched each design without trying to stitch in the same place. I practiced that technique on this quilt and must say it's very easy. It only took a day to quilt. Plus a lot of thread. Multiple loops take more thread than you think.

Detail of loose circles on Polka Dot quilt

Freddy encouraged us to include lots of dotty fabric which makes a festive look.

I bound it with a black and white stripe printed on the diagonal. Yes! Cut straight of grain but looks like bias binding.

Binding and quilting detail of Polka Dot quilt

It arrived at Great Debater #4's home last week and he loves it. Don't we all want a recipient who truly values our quilts? Lucky me.

Quilt Details
Size: 70" x 82"
Pattern: Polka Dot or Freddy Dot Com
Batting: Mountain Mist Cream Rose 100% cotton
Thread: Gutermann red cotton 
Quilting: Loose free-motion circles

Other posts about this project:
  1. Fabric pull 
  2. Drafting differences of Racetrack and Drunkards Path
  3. Beginning
  4. Borders
  5. Finished top
Enjoy the day, Ann

Saturday, February 18, 2017

String Quilt for a New Grandmother

Ok. I got sidetracked. Instead of working on Coins or Spiderweb, I finished a top for a dear friend who recently became a grandmother. No complaints though. A finished quilt is always a win plus it only took a day to baste, quilt and bind this little toddler quilt which will be perfect to use when the baby visits.

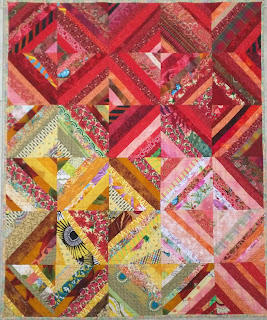
String quilt quilted with a grid pattern using a walking foot.
Red and yellow string quilt, quilted and bound

The quilting design is a variation of the one I used on the blue string quilt. This time I stitched in the ditch of all the blocks then stitched a half-inch away on each side. Finally I divided the remaining space into half and half again (four equal-ish sections.) It was easy to quilt from point to point with the walking foot after eyeballing the spacing and marking it with straight pins. The ditch stitches only show on the back; that makes the front a bit plainer than intended.

Quilting point to point using
straight pins to mark the points.

The fabric for the back has been in my stash for years. {In fact, I just culled it. Sitting on top of the "future sleeve" pile made it more noticeable.} What a treat to have sufficient yardage for the entire back.

Red and Yellow String quilt detail:
quilting, binding, and backing

The same fabric creates the binding, too. It is cut separately, not pulled from the back. The fabric is naturally blurry and a third of a yard still remains.

The best thread color turned out to be brown. Blending with both red and yellow, it's not too harsh on either color.

Quilting detail, red and yellow string quilt

Quilt Details
Size: 40" x 48"
Design: String quilt on paper foundation
Batting: Mountain Mist Cream Rose 100% cotton
Thread: Brown Metler cotton
Quilting: Walking foot on a domestic machine

Enjoy the day, Ann

Tuesday, February 14, 2017

Into the Ditch

As many of you know, I quilt on an older domestic Bernina with a fairly small throat plate. With a large quilt, it helps to stitch in the ditch along major seam lines.

I started by stitching the block boundaries vertically and horizontally. Each block contains a "star," not a spiderweb. This stitching starts and stops which also means loads of thread tails to bury. Next I stitched the border seams. Now I'm stitching around each spiderweb by rotating as the needle moves from point to point. With care, you can turn the quilt when reaching the borders. That translates to only two threads to bury. Yay!

These photos may help visualize what I did: Sew across the X where two spiderwebs meet.

Sew across the X where two spiderwebs meet
Turn at the inside of the star.

Turn at the inside of the star.

Fortunately I have two machines so while I quilt on my Bernina, I can still sew Coins on my Featherweight. Not both at once, you understand. But no time wasted changing needles and thread.

Here are some more possible Coin pairs. The yellow floral with brown/yellow/white plaid is not working for me. I don't think I'll use it.

Possible Chinese Coin pairs.

Although I haven't written about this in a while, I'm still working on my old Sampler quilt - usually while listening to the news at night. This is the final block to be hand quilted but it's still a long way from done. Twenty-nine years and counting.

Sampler quilt {still}in the hoop

Of course, if I'd worked on it regularly it would have been finished years ago.

Enjoy the day, Ann

Saturday, February 11, 2017

My First Chinese Coin Columns

It can be difficult to make a quilt with a certain person in mind while also creating something that maintains your own interest throughout the construction. My niece's style and color palette are much quieter than my own.

Currently I'm pairing fabrics for each column with the idea of adding bits from the scrap bag when the columns are too short. Here's what I have today.

First two columns of Chinese Coins

Despite adding a block of daisies and dots, the blue column is still a bit short so I'm also inserting those darker blue strings. The columns aren't completely sewed yet. {"Just say no," to unsew.} Sets of four or eight coins makes them faster and easier to move around than those little bitty triangles in the Spiderweb border. I'm setting aside a couple of coins to work with inserts.

Short coin stacks let me change
my mind easily during construction

Enjoy the day, Ann

Tuesday, February 7, 2017

Chinese Coins Fabric Pull and Spiderweb Back

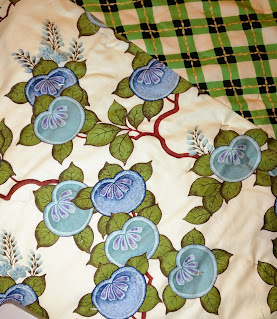
Sometime in the late 90s I bought a Balson Hercules fabric called Fujiwara by Susan B. Faeder. {Reading the selvedge.} It has always been a favorite, one I intended to use but never have. It was my first choice for the back of the spiderweb because there's over four yards, it was still in the stash, and it makes a statement. At least I will be able to visit it easily by turning this quilt over.

I combined it with some soft blues then added one funky green/black/beige plaid to pump it up. {Who remembers "Pump you up" from Saturday Night Live?} The longer I look at this, the better I like it.

Spiderweb quilt back with
Balson Hercules "Fujiwara" fabric

The quilt was almost completely pin basted when I realized I'd rotated the front ninety degrees. Darn. Another evening spent taking those pins out. Then pinned it correctly. So feather-headed.

It's far enough along that I could start pulling fabric for Chinese Coins. While pondering what tack to take, I read this:

"The next step is to do a pull of all the fabrics I have been aching to use and to see how they look together." Kathy Doughty

What an exciting way to approach a scrap quilt. But, I also need/want to make a quilt for my niece who is decorating her new home in turquoise, yellow, grey, and white. And I happen to have lots of light blue leftovers right now. {Insert maniacal laugh here.}

I pulled these from my stash and {for now} intend to supplement them with leftovers in the scrap bag.

Fabric for Chinese Coins

"Landscapes/naturescapes"

Did you know there's a way to move/regroup photos on your Pinterest boards?  I've been doing a lot of that lately. Creating order by commonalities allows me to think. {That's a geologist for you.}

It never occurred to me to combine a traditional block with a painting until I saw Deb Hyde's work. Someone posted this time lapse YouTube video showing the development of Lucy ITSWD several years ago but few people seem to know about it. I'm awed that anyone could keep two balls in the air -  a specific quilt style and a scene. Definitely one to enjoy over your morning coffee or tea.

Which came first, the chicken or the egg? The form or the scene? The answer: it depends.

Diane Wright's Thimble Islands shows sea, sky, and islands in blues and browns while Ululu (Ayers Rock) rises in the distance across a wide valley in Ann Bauer's Summer Comes to the Mountain. (It's about the middle of the page.) The regularity and precision of column widths in both makes me think they envisioned this arrangement from the start. In fact, Ann's website shows several works created in a similar style. The phrase "working in a series" comes to life as she develops her ideas.

Diane's free-hand cut coins emphasize waves hitting rocky shores. Ann's straighter cuts create a flat, grassy plain with a hazy distant mountain. By curving the pink fabrics she perfectly conveys a setting sun reflecting on wispy clouds.

On the other hand, I think I'm overlaying the Coin form on the finished quilts of other artists. I could easily be reading more into it than they intended but  I'm struck by how well the Chinese Coin design evokes an impressionistic scene.

From Sue Kelly's previous posts, I know she did not use stacked coins as a starting point. She randomly cut and sewed fabrics until she ended up with her design for Abbott's Lagoon... which just happened to resemble Chinese Coins. Now that she's quilted and embellished this piece, it's even easier to distinguish the tidal flats, mud flats, grassy hummocks, and deeper waters of this lagoon. So much detail.

In a previous post I referred to Kaja's Build Me a Wall but it's still the only scene I've found that's a closeup of a manmade structure (rather than a panorama.) I'm unsure if she started with a Coin format but she wrote about some of her other works recently. They demonstrate how one's starting idea can unfold into more expressive form.

In fact, this Rail Fence began with leftovers from Chinese Coins. I added some darker blues, raided the scrap bag for odd strips of triangles, and worked them into a different form by rotating sections.

Improv Rail Fence built from Chinese Coins

Whether an artist arrives at a Chinese Coin layout purposefully or in retrospect, I'm delighted to find it possible to use a structured form to create a natural scene. Even if you start with some Coins, remember you're the creator of your own quilt. Feel free to change it any way that works for you. Let's celebrate all of us!

Enjoy the day, Ann

Saturday, February 4, 2017

Spiderweb Borders Complete

The top is finally finished. It measures over ninety inches in each direction which is good for a queen-size bed. The lighting is off. I tried all hours of the day but couldn't get the colors to photograph properly. {And you know it no longer fits on the kitchen floor.}

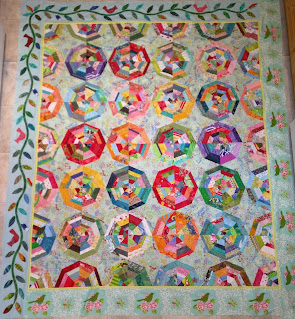
Scrap spiderweb blocks on a light blue printed background with three borders.
Spiderweb with all borders

Taking the wider triangles out of the narrow sawtooth border made the rest more coherent. The background of the small triangles is yellow while the outer background is pale green. It makes a nice change from the center.

In many ways these borders remind me of heavily carved antique Spanish picture frames I enjoyed at the Dallas Museum of Art. They are "important" enough to set off the center but they also stand on their own, not an afterthought. The homey, slightly awkward construction pushes it towards 19th century American folk art.

Here's a detail of the color change and the borders. These colors are very close to the actual quilt.

Spiderweb quilt border, detail

The improvisational style of the triangles is more apparent in this photo. Especially on the narrow border, the width of the triangles as well as their points vary. On the outer border the triangles were cut close to thirty degrees. The width and height still vary but not as much as the inner triangles. Because of the similar angle it was easier to exchange foreground and background within the rectangles. {Important discovery: It's very fabric-expensive when you can't change any pieces around but always have to cut new ones.}

Since everyone's taste differs, other people may have stopped at a different place or moved in a different direction. This quilt could have easily expressed several styles.

For instance, here's the spiderwebs alone. This might be the stopping point for a true scrap quilt.

Spiderwebs with no borders

While here it is with only the plain border. A quieter quilt that could highlight elaborate quilting in the border.

Spiderweb quilt with plain border only

With only the applique it could move to a very traditional finish - with our without a second border.

Cardinal rest on the applique vine border of this scrap spiderweb quilt.
Spiderweb quilt with applique border only

Finally, I photoshopped this to see what the quilt would look like with sawteeth pointing out.

Spiderwebs with sawteeth pointing out,
photoshopped detail

It's interesting to discover the crossroads of quilt construction, the places where your decisions change the style of the quilt. And what a joy that we can each make quilts to please ourselves if we take the time to verbalize our reasoning. Thanks for all the help. You pushed me to articulation; I needed that.

Enjoy the day, Ann

Wednesday, February 1, 2017

Kaleidoscope of Butterflies #13

Cathy and I use this monthly linkup to spread the word about butterflies, their beauty, and what we can do to keep them around. While this may not be the month to see many in our areas, we can start some preparations for spring.

If you don't already have milkweed plants, this is a good time to purchase seeds since cold stratification helps them germinate. Here's a good article on growing milkweed from seed.

Save Our Monarchs is currently offering asclepias incarnata milkweed seeds free. Please add a donation so they can continue their efforts. This variety (swamp milkweed) is native to parts of eastern Canada and the lower 48 except the Pacific coast states, Arizona, and Mississippi. See this map for details.

If you check reputable suppliers in your area you'll be doing the greatest good. Buying varieties that are native to your county means they bloom at the "right" time encouraging butterfly migration. Those butterflies have a long journey and need sustenance all along the way. Although the article speaks about Texas varieties, the principle applies everywhere. Here's a list of varieties found in different states.

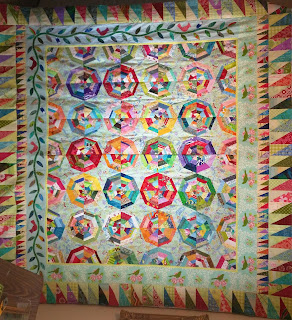
On the quilting front, the first sawtooth border is sewed to my latest spiderweb. It's looks much better than the original layout after culling the "wider" triangles. There were too many itty bitty triangles to move but I intended to preview some type of floater border once the strip was sewed. In my rush to "get to a stopping point" I forgot. On balance, I'm okay with this. A yellow floater would just make these triangle points a bit further from the vines. A contrasting floater would add emphasis where it's not needed. That's my story now because I'm not unsewing this row.  :-)

While spiderweb is not a kaleidoscope, it's made with a kaleidoscope ruler. And I'm really trying to focus on one project at a time. Well, one and one UFO and one new top. Unless I get sidetracked. Squirrel!

Spiderweb with first sawtooth border attached

I found the limit of my kitchen floor. Not sure where I will be able to take a photo next.

These pretty butterfly fabrics made their way into the triangles.

Butterfly fabrics used in spiderweb
Cathy has a charming tutorial to create butterflies from waste triangles. Take a look.

Enjoy the day, Ann

InLinkz removed because it was hacked.