Tuesday, November 22, 2016

Red String Blocks and AHIQ Linkup

What improvising or utility quilting have you done this month? I'm still working on the string blocks.

The red set was difficult for me to lay out. First, there weren't enough to complete a toddler quilt so I added the remaining yellow blocks. I'd previously used many of the yellows so these are gold to brown.
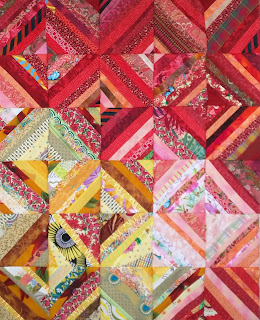
Quilt blocks composed of strips of red fabric or yellow fabric.
Red and yellow string quilt

Here are four possible layouts I considered. They all use the exact same blocks. No leftovers. I find it particularly interesting how block placement affects the vibrancy of the quilt.

Possible layouts for the red/yellow string quilt
  • Top left: The light peach blocks are dispersed and this quilt is too dark for me.
  • Top right: Putting the peach blocks in the lower right divides the top into dark on top, light on bottom. No spark or transition.
  • Lower left: I like the peach X and the way the yellows seem minimized. This arrangement was my second choice.
  • Lower right: The peach diamond is too light for the center of this top but gave me the idea for the final arrangement.
Fun and games!

Enjoy the day, Ann

InLinkz removed because it was hacked.

Saturday, November 19, 2016

Green String Toddler Quilt

For once, an easy finish. The stash of presewn blocks made this a quick job. I laid the blocks out and sewed them up in one afternoon. Small tops take very little quilting time. I channel quilted on the diagonal using the walking foot and casually spacing about the width of that foot. With this design, it's important to keep the quilt square with your hands or it can warp into a diamond.

Green String toddler quilt

Continuing my vow not to save fabric for a {possible but unspecified} future use, these two made a delightful back. The yellow moons with lilies have always made me smile.

Back of Green String toddler quilt

Originally I cut some light green binding but didn't like it. When I added it to the little box of leftover binding I found lots of green remnants. They work much better for me. The purple dot is the last of an apron made two years ago for my dear sister who's passed away. It's a cherished memento.

Binding and quilting detail on green string toddler quilt

Off to my darling grandson this week.

Quilt Details
Size: 40" x 48"
Batting: Mountain Mist Cream Rose 100% cotton
Thread: Gutterman green cotton
Quilting: Walking foot on a domestic machine

The next AHIQ linkup is the coming Tuesday. What utility or improvisational quilting do you have to share?

This Thanksgiving I hope we all consider how we can share our many blessings with others.

Enjoy the day,
Ann

Tuesday, November 15, 2016

Remember Those String Blocks?

At the end of last year I sewed all my scrap strips into string blocks by color. Later a few {the softest and sweetest} went into this yellow and white baby quilt. The others gathered dust until this week. I'm on a recurring binge to clear out my sewing room so they definitely needed to be moved along.

Not only that but I've been informed the darling grandson needs "lots of quilts." A couple of months ago I was not to send any. My, how things change. Not that I'm complaining.

To keep it simple I laid the blocks out by color. There were almost enough greens for a toddler quilt; just two short. Fortunately there were only two purple blocks and they fit right in.  The red squares are absolutely the last bit of strip piecing left from my Watermelon quilt. Originally it was planned as the inner border but didn't work. I also used some on this improvisational quilt.


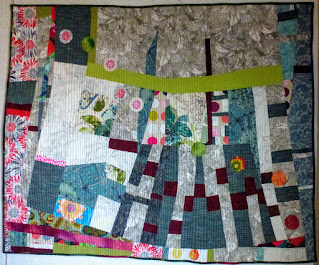
I'm reposting the photo of the finished Round Robin Improv here. Do you see a bit of this same paper piecing?

Improv Round Robin

It's across the bottom on both sides. Isn't it great to find uses for discarded work?

Enjoy the day, Ann

Saturday, November 12, 2016

T-Shirt Quilt Finished

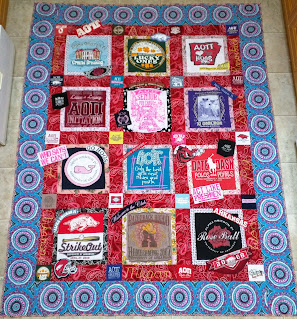
This quilt is finally done and in the mail. Wow. It's taken longer than any other t-shirt quilt I've made. {Guess I'm out of practice.}

She wanted many t-shirts incorporated. They each represent an important memory. After choosing the twelve main blocks she then selected 20 pocket logos for posts. Did you notice the lower left block is actually two t-shirts sewn together?

University of Arkansas and Alpha Omega Pi t-shirts framed in light prints, sashed with red.
Megan t-shirt quilt

Text bites and images from  the remaining shirts and leftovers from shirts already used were scattered across the surface and machine appliqued with matching thread or invisible nylon. These are usually placed in bare areas of the larger blocks and extend into the sashing. Two of them are actual pockets cut so the pocket still works. With so many layers, both sewing and quilting must be slow and careful.

And look at the binding. It's an older 30's reproduction plaid on point that I loved but never used. I think it goes very well with both front and back. Who'd have thought? {I love mixing styles unexpectedly.}

Megan's t-shirt quilt, detail of binding,
backing and free-motion quilting

 Quilting the border seemed daunting originally. How would I highlight the huge circles. I worried too much. It's a combination of spirals with echos to get to a new area. I used purple thread. The pink and blue threads were too severe on alternate colors. Purple blends pink and blue; perhaps that's why it worked here.

Border folded to half circle

We considered cutting the binding at half and three-quarters of the circles by the simple expedient of folding the border back.

Border folded to 3/4 of the circles

The half circles may be my favorite but overall, the border seems too narrow for the quilt. The partial circle is neither here nor there.

Quilt Details
Size: 77" x 96"
Batting: Mountain Mist Cream Rose 100% cotton
Thread: Various cotton, Metler neon polyester, YLI invisible nylon
Quilting: Walking foot and free motion on a domestic machine

Enjoy the day,
Ann

Tuesday, November 8, 2016

Free Motion Quilting Designs

The narrow frame around the t-shirts needs quilting designs so I decided to practice a different one in each. The stitching doesn't show much from the front so these photos are from the back. I'm not sure it's any more visible.

These easier ones started it off: loops, hearts, Greek key, and leafy vine.

Designs of loops, hearts, Greek key, and leaves in free-motion quilting
First set of linear free motion quilting designs

There are also some s-curves and circles on the black fabrics. Then I was running out of ideas but remembered Lori Kennedy's blog. I chose to attempt {with varying amounts of success} mistletoe, daisies (with too many petals), basic bow, and paper clip (which looks more like a spiral.)

Second  set of linear free motion quilting designs

This was a good place to try out so many different designs. None of them really show but I entertained myself. Now to finish the wide red sashing and the outer border.

Enjoy the day, Ann

Saturday, November 5, 2016

Progress on the T-Shirt Quilt

Although I haven't written about it for a couple of weeks I'm still working on the t-shirt quilt. Of these three backs, M chose the zigzag pattern. (Pink is her favorite color - as if you couldn't tell.)

Three possible quilt backs

Next step is to pin baste - probably my least favorite part. As usual this involves moving folding tables, digging out pins and clamps, pressing front and back and letting the batting relax. It's so tightly cramped in the bags there are lots of creases.

My tables are long but narrow so I move the quilt package several times while basting. I used to pin on the floor but can't do that anymore. Weird late night colors.

Pinning the quilt

Then I ditch stitched the seam lines. I worry that the mixture of knit and woven may cause the seams to ravel. Also it helps consolidate smaller sections to quilt.

Now to fill it all in.

Enjoy the day, Ann

Tuesday, November 1, 2016

Crazy Quilted Box and Kaleidoscope of Butterflies Linkup

What a treat! Lisa Boni taught a workshop to our guild last week about crazy quilting these tiny boxes. This gifted teacher hails from Colorado and blogs at Ivory Blush Roses. She showed several years of her work during her lecture and pointed out how it has improved. That gives me hope perseverance will help mine, too.

I've followed her blog for a few years because always enjoy her work (as well as her paintings) and her generosity in sharing details of it. However, I seriously doubt I will ever make an entire crazy quilt. That's a benefit of this workshop; it only takes a day or two to complete. With holidays on the horizon, I plan to make several for friends and family this year.

Red and pink silks form the crazy quilting base. Lisa Boni workshop.
My first Crazy Quilted Box

These little boxes started as Altoid tins. {I've been saving them for a year and have a huge supply.} Lisa's kit (which was optional) included templates, cardboard, felt and all the thread, beads, and ribbons needed for the project. She gave us thorough handouts of steps involved in completing the boxes and answered all questions as we worked.

Red and pink silks form the crazy quilting base. Lisa Boni workshop.
Side view of Crazy Quilted Box

By the end of the day mine was almost ready to glue together. {I'd gotten a bit chatty during class.} I glued it the next day. Now I realize I should have put a butterfly on the work instead of that starburst. Next time!

The hummingbirds have flown south. A few winter over but haven't come by my house yet. The butterflies are gone, too. My milkweed has seeded. All in all, winter is coming. And since I finished the latest kaleidoscope, I haven't started another. What have you been up to?

Enjoy the day, Ann

InLinkz removed because it was hacked.