Tuesday, September 29, 2015

Selvedge String Race Quilt and First AHIQ Link Up

This is why I keep my fabric in clear containers. When I decided to save selvedges, the only empty spot was a small drawer. Stuff kept going in; nothing came out; it was easy to forget. But now that it's come to light, I simply have to "make it or move it." My improv book study chose to work on strings again this past month. I have several ideas but these selvedges are screaming for attention. So I'm combining the two projects.

Selvedges stashed in a drawer are finally brought
 to light when the drawer no longer closes.

Problems:
  1. Huge variety of lengths. Some selvedges are one-eighth yard while others are three yards.
  2. I saved both sides of the fabric. One has printed information while the other may not have any white at all.
  3. Some selvedges are bound-edge while others are fringe-edge.
  4. I don't want to use a foundation. (The Hotter'n Hell Hundred helps explain my disinterest in thick quilts. No. I have not raced, but I have lived through these summers.) 
Racing reminded me. My sister made a Jelly Roll Race quilt at her guild retreat last year. I've never made one and don't buy jelly rolls but the fabric shape seemed similar enough. Sew long strips end to end making a very loooong strip. The ends are brought to the top so two sides can be sewn together to the fold. Cut and repeat until your quilt reaches the length/width combination you want.

Starting on the woven edge, I backstitched to keep it from unravelling when I cut the thread close then sewed off the cut side.

A new problem arose. Because the selvedges can only be sewn one way, that loooong strip has to be cut in half before sewing two strips on the side. That's manageable although the strip is as long as Rapunzel's hair.

I tried to pair both selvedges from each fabric but otherwise just used them as they came. Random selection. They range in width from a scant half-inch to three inches. Greater consistency would be better if I cut selvedges again - perhaps one-inch past the printed section or 1.5 inches total.

Here's what it looks like with the first two strips sewn.

Selvedges sewed end to end.
Then overlapped and sewed together.

The improv book study met the next day and I had only completed one more repetition. Mine is on the left in an accordion fold (Ten folds actually.) Look at the delicious results from everyone. Clockwise from mine, Tami alternated glorious golds with skinny navy strips. MN organized her strips into color groups and crosscut each with an X. She's almost finished binding this delightful small quilt. ML created wonderful mockups of different ideas using digital color photos. (She keeps them in a binder. I need to adopt this idea.) Now she's creating a table runner with large triangles of strips.

A second month of String tops 
from the Improv Book Study

I kept working that evening. Here it is after four rounds of cutting and sewing. Wow, a string sheet. The Race is on!

Use selvedge strings to create fabric.
Selvedge Race string sheet.

The sheet curves to the right rather than straight. I need to think some more.

It's time for our first Ad-Hoc Improv Quilt Link-up. Improv has so many different meanings. Although Kaja and I have written several posts recently, we are on tenterhooks to read your ideas and see how you've been working.

Enjoy the day, Ann

InLinkz removed because site was hacked.
Saturday, September 19, 2015

It's Even Better to Finish Quilts for Young Friends

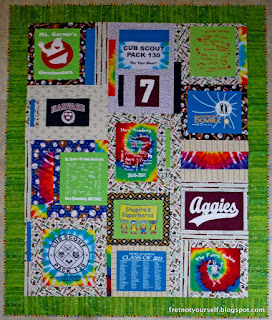
Two easy finishes! Both the t-shirt quilts are done and gifted.

Colorful t-shirt quilt sashed with baseball prints. Wide green border, striped binding.
Baseball t-shirt quilt

Because each shirt was cut to the size of the printing on it, there were some "shortages" when it came time to sew them together. Those areas were filled with t-shirt tails. The green square printed 2006-2007 in the quilt below was short on two sides. Those two tails are very successful {in my opinion.}

T-shirts sashed in black and white fabrics.
Black and white t-shirt quilt

A meandering pattern was the easiest way to avoid the "rubbery" parts of the t-shirts. (Poking needle holes in the rubber just makes it peel off.)

Baseball t-shirt quilt detail

Even the bindings came from stash. {Keep that fabric moving, is my motto.} The lengthwise stripe on the baseball quilt was very easy; just cut WOFs. The zigzag ran WOF so I cut binding lengthwise on a half-yard. Many joinings. Barely enough to bind the quilt. But worth it to me.

Striped binding on two t-shirt quilts

However, the level of my stash has not been noticeably reduced. Doggone it.

Enjoy the day,
Ann

Saturday, September 12, 2015

It's Good to Have Young Friends: Thoughts on Improv Quilts and Over Dyeing

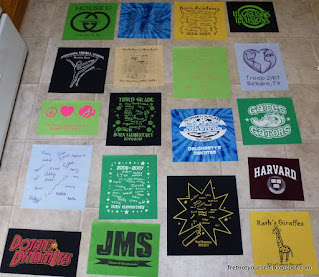
We have two darling young neighbors in Houston. Guess what they wanted? Yes, t-shirt quilts. All the shirts are interfaced and cut using a ruler. They belong to someone else so I'm trying to be careful. But I plan to piece them improvisationally using only my stash.

In the past, I cut or sewed the shirts to a uniform size, sashed them, and created a grid. This time each was cut to the size of the printed design, then arranged randomly. I'm  estimating the space between two shirts, cutting strips of fabric about three-fourths that width, then sewing them to a t-shirt. The widths range from two to four inches. Some will be cut down further to fit together but I want room to maneuver since there's no pattern.

Baseball t-shirt in progress.
Each shirt will be sashed a different width.

One neighbor plays baseball. The other favors black. I've pulled every bit of fabric that meets either of those requirements and there is plenty to make the quilts.

Original layout for the future black and white t-shirt quilt.

It occurs to me this is roughly similar to Kaja's simple shape - I'm using a square like she did. (Of course, the t-shirts are a coloring book compared to her sophisticated masterpiece.) Mine are large; the printed designs are the centerpiece. Hers are much smaller; she created her squares from two smaller pieces. You could use large scale prints or novelty fabrics to create squares.

You could also improvise using old workshop samples and leftover blocks. (Dip your toe into the water before you jump in.) Lay them out, sash around them, and trim to fit pairs together. Don't worry if the fabrics of your blocks don't match. Years ago a speaker at our guild did something similar. I can't recall her or her name, just the memory of this quilt. She used all her old class samples and orphan blocks. Nothing matched until she over dyed with a tan. Voila! It all blended together; everything was suddenly "reproduction."

Chawne who blogs at Cauchy Complete has been over dyeing her quilts with indigo. It's a much more modern look. The link points to one post but she has made several this way. Be sure to look around her blog.

If neither of those colors suit, what about cheddar yellow? [Americans use annatto seeds to color cheese a bright orange. I always thought it was another crazy-yankee idea but this National Public Radio article places blame for the practice back on the British. Could it be true?]

Now I'm really on a roll. Take a look at Lynn's Scrap Vortex. She incorporated orphan blocks with her scraps to make a very creative improv quilt. No overdyeing needed here.

Kaja and I have gotten several messages from people planning to join us. If you are still on the sidelines, jump right in. We all have different styles; when you share, there will be even more methods.

"Do what you can, where you are, with what you have." 
Theodore Roosevelt, 26th U.S. President

Enjoy the day, Ann

Saturday, September 5, 2015

Another String Improv Quilt: Rail Fence

You probably realized there were {a few} extra string sheets from my previous quilt. Actually, there were enough to make an even larger quilt. Fortunately, that first one sparked several ideas for future quilts. String 1 reminds me of Chinese Coins with long bands of similar colors and all stripes pointing in the same direction. I want the stripes to point in both directions in String 2. What's an easy way to do that? Rail Fence.

Improvisational Rail Fence quilt

Although it's one of the most common string quilt designs, I'm sure recent examples nudged my consciousness. Sujata Shah has a delightful quilt along of her version of this pattern. I made one as a graduation present for my youngest.  Earlier this summer I saw Drew Steinbrecher's Line Study #4. Wow! Gloriously clear colors with stripes pointing in both directions... like a rail fence. Bill Volckening shows a rail fence from 1975 on this post. Plummer Pettway of Gee's Bend created this version she called Crazy Quilt documented by Auburn University. It's frequently listed as Roman Stripe but looks like rail fence to me.

First, I laid out most of the leftovers to get an idea of size. Sherri suggests this in her book, IHMQ, as a great way to determine approximate amounts of fabric. Many of these are already cut into pseudo-squares but some are still long sheets.

Leftovers from Improv String 1

Then I moved some sections. Basically a rail fence at this point. I want to experiment by varying block sizes more.

Beginning String 2

As usual, I started sewing sections together in rows from the top left. Wrong move. The quilt becomes columns. That worked for the previous quilt but not this time. Section lines can be hidden by building up several distinct areas. Sherri (Daintytime) mentions this in the Floating Squares score as does Amanda (Crazy Mom Quilts) in Scrap Vortex. So I went back and put some smaller pieces together, building larger and larger sections. Sometimes two small blocks join to one larger block.

The colors were becoming mushy as the section sizes increased. A lavender-and-white-stripe home decor fabric and three darker blues from the discarded set increased the value range. Some strata are too long; I plan to cut them. Others, I left whole. To mask long fillers, Sherri suggests strips pieced from multiple fabrics (IHMQ, p. 29.) Amanda uses a similar method to equalize larger blocks. Pre-sewing a few pieced, skinny, filler strips might keep me from adding overly long pieces. {Didn't I say that last time?} Where to find some...

Adding lavender and white stripe

The paper pieced remnant below was my first attempt at an inner border on the watermelon string quilt. It didn't work there and it doesn't work any better here. Oddly enough, the only place it has fit is the Round Robin quilt - cut into three parts.

Leftover paper piecing as a possible filler strip

Another dive into the scrap bag brought some string-pieced triangular crumbs. I made them a few months ago, thought they were ugly and tossed them in the bag. Not only do they fit here, they also are those pieced, skinny, filler strips needed to join larger sections.

Reworking the layout; adding pieced triangles

The final scrap of a sawtooth border print only works because of the other triangles and the added blues. It's on the right. Do you see it?

Sewing sections together

I love, love, love different stripes. Especially red. Some of my striped fabrics are printed along the warp, others along the weft. In both cases, I cut across the fabric width (weft-wise as it were.) It might have been better to cut across the stripe whichever way it fell. Something to consider.

Kaja's post this week suggests starting an improv quilt with a single shape. What are your fabrics suggesting to you?

Enjoy the day, Ann

Wednesday, September 2, 2015

Ah, AHIQ Begins


After a good six months of conversation and planning Kaja posted our preamble to improvisational quilting. Yesterday she started the ball rolling with our first AHIQ post. Be sure to check it out.
Ad Hoc Improv Quilters
Initially I was surprised at the broad interest for an online improv group. So many quilters have expressed a desire to join us. Then I realized we are drawn to improvisation in the same way we were drawn to quiltmaking. We need to express ourselves (or find our voices.) We want to be joyful in our work rather than worry about meeting external standards of precision, design, color, or fabric. We want an original rather than a copy. There are times to use someone else's pattern but there are also times to create our own. With improvisation, we riff off each others' themes or head in completely new directions. We work in a community to create something uniquely personal.

As Kaja wrote, improvisation has at least two definitions - creating spontaneously without preparation and making something from whatever is available. While I can agree with creating spontaneously from what is available, I personally doubt much is created without preparation. 

A science-fiction author recently stated that spontaneous writing only happens after days of preparation - summary, plot outline, character description, location description, and more. Similarly my filmmaking friend assures me directors deliberately choose to shoot with handheld cameras for a rough, homemade look. They don't just wake up and start filming. Afterwards, editors cut and rework these random scenes into a cohesive story. 

So how can we prepare to be improvisational? 

If you are going to create spontaneously from what's available, why don't you get reacquainted with your stash? Sort by colors; sort by theme; sort by age. What do you collect the most? What makes you smile? Your stash already describes you. Out of the entire universe of fabrics, these are the ones you chose. It's the first curation. Listen carefully because it speaks volumes.

      "There is no one alive who is Youer than You!" Dr. Suess, Happy Birthday to You!

I'm not suggesting you reorganize your entire stash immediately... or ever. I am suggesting you pull a good assortment to help you notice patterns in your choices. If you store them in different places, try getting a bit from each of them.

Next, pull out a fabric that excites you. Pin it on the wall or throw it on the floor. Then place your other fabrics next to it - especially those from a different fabric line. Take photos. Which grouping surprised you most? Excited you? Start there.

Pat it or cut it. Pin it on your wall. Make a block or make several. Make triangles, rectangles, hexagons or any other shape. Then take the next step - the one that's right for you.


We look forward to what you link up with us Tuesday, September 29.

Enjoy the day, Ann