Sunday, December 28, 2014

Quilt Exhibits and QR Codes

Currently, the San Jose Museum of Quilts and Textiles has two Amish-related exhibits. The display of antique Ohio Amish quilts runs into March 2015 but the Modern Amish closes January 3. That's the end of this week! Three Bay Area Modern guilds interpreted Amish for this show. I hope you see them both as they are a very interesting juxtaposition.

One of my challenges this past year was to co-chair an exhibit for CQFA (California Quilt and Fiber Artists.) Primal Green II is on display at the Wallace Stegner Environmental Center located on the 5th floor of the main branch of the San Francisco Public Library through April 25, 2015.

Lighted sign at the entrance of the Wallace Stegner Environmental Center, SFPL Main Branch
Sign for Primal Green II exhibit

This sign at the exhibit entrance includes detail views of works by Dolores Miller, Reva Bailey, Diane Carver, Jennifer Landau, Caroline Ogg and Virginia Schnalle. The twenty artists who participated use techniques including silk painting, weaving, felting, paper piecing, stamping, dyeing and applique to create their art.

We included QR codes with the displays. These versatile bits of code link to text, video or audio files - basically anything that can be put on the web. Smartphone apps read the QR code and send you to the referenced site. Most are used as an advertising or merchandising tool but we simply wanted to enhance viewer knowledge and interest. So we created audio files discussing how or why we made a piece.

While some companies create QR codes for a fee, freeware exists to generate your own. One of our members wrote a short program to create ours. I think the main difference is where your file is hosted. If you already have a website, it seems simpler to keep it there. Commercial companies place it on their site.

Despite being incredibly enthused, each of us was hesitant to actually record. What would we say? How long could/should it be? Why didn't some famous actress come sweeping in to do the recordings? And a scriptwriter! Ok, the last two are pipe dreams but we were extremely self-conscious about our own abilities. It took several attempts to record without hesitation. Writing a script definitely trumps ad lib.

Audio explanation of the inspiration for the quilt, A Daisy a Day.
QR Code for A Daisy a Day.
It links to an audio file explaining
my inspiration for this quilt.

This QR code links to my audio file for A Daisy a Day, the first quilt on this blog. I posted the code here to encourage other quilters and quilt shows to use this technology. It takes bravery to start a blog. What unique things do you have to show or say? Would anyone take the time to read it? However, it takes a whole new level of courage to publish your voice. If we can do this, so can you!

The are many inventive ways to use QR codes. Upload a bedtime story and print the QR code on the quilt label for your grandchildren to hear every evening. Relate family history, reminisce about a special event or make a prediction about the future. What would you share with your family and friends?

Enjoy the day, Ann

Sunday, December 21, 2014

Enlarging (or Decreasing) Circular Blocks

Several people have asked how I drafted the larger blocks in my Steam Punk quilt. It's an application of basic high school geometry. No kidding. The geometric principle is this: similar figures have proportional lengths and congruent angles. That means you always multiply lengths by the same amount while angles stay the same.

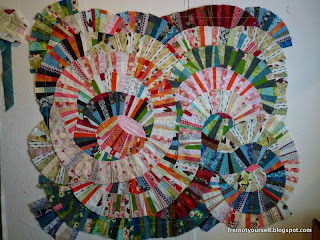
Steam Punk quilt with larger and small blocks
How do you do it?

1. Measure your original block and decide how large or small you want the new block.

I won't give the exact measurements of Steam Punk; you'll have to buy that pattern. But let's pretend the original finished block was 4" and the blades intersect the side 1.25" from the corners (Fig. 1 below.)

Fig. 1 - example of original block at 4-inches

2. Calculate the scale factor (new finished block size/original block size) to determine how long the new segments will be. My new block finishes 8" so my scale factor (8/4) is 2.

Draw a new block 8" on each side (4" x 2) and mark the center of the block. Using the scale factor already!

Mark points on all four sides 2.5" from the corners (1.25" x 2). Scale factor again!

Fig. 2 - example of drafting an enlarged circle block

3. Draw lines from the center to these points on the side. (Fig. 3)

Using a compass with the sharp point in the center of the block and the pencil at the side point 2.5" from the corner, draw new curves for the blades. If your compass won't expand that far, use your ruler. Place the end on the center of the block and align the ruler through that 2.5" point.

Notice the measurement on the ruler. On my example it's about 4.25".

Fig. 3 - enlarged block with main lines drawn

4. Now rotate the ruler slowly in an arc, keeping the center at the ruler endpoint. Use your pencil to mark many small dots at the same length until you reach the 2.5" mark on the next side (Figs. 4 and 5.) Connect all those points to mark the blade curve.

Note: If you're making a really large block, use your rotary ruler. This tiny ruler just made the photo easier to shoot and see.

Fig. 4 - drawing a circle or arc on an enlarged block

Fig. 5 - enlarged arc is drawn

Once your block is drafted, check the central angles by placing your original blade and triangle templates on the new block pattern at the center. The sides should line up perfectly. The templates are just shorter than your new length.

The radius of the center circle will also be multiplied by the scale factor. So if it was one-half inch originally, it will be one inch in this example (1/2" x 2).

Trace each template, add seam allowances and you're ready to go!

Hope this helps. Let me know if you have questions.

Enjoy the day, the holidays and the New Year!
Ann

Friday, December 12, 2014

Curves Continued

One of my difficulties with this quilt has been limiting the size. I can't see the edges of the quilt. At one time it seemed it might not stop before the edge of the design wall. Yikes.

Improvisational curve quilt in shades of pink, coral, red, blue, green and white
Finished size of curve quilt

Then I thought of using string to outline a rectangle. It's a bit more visible in the photo below. Basically, I'll square up the quilt near those lines but at least I'm aiming at a general size now.

Detail of string used to outline the perimeter of the quilt

I was planning to make some straight-ish sections to fill in the background but most of the quilt was already filled once I marked an area with the string. So I just made a few more to finish the corners.

I also rotated the bottom right curve. Q just wasn't cutting it. (That's what last week's photo looks like to me.) This layout connects with the rest of the quilt better. I'm still thinking about the other curves.

Enjoy the day, Ann

Friday, December 5, 2014

Curve Quilt Progress

I'm learning so much while working on this quilt.  More of these sections need to be sewn together but it's almost impossible to take one off the design wall and get it back in the exact same place. I machined the coral/orange white circle and interior but may switch to hand sewing or Vikki Pignatelli's method for sewing curves.

Vikki machine appliques the curves with Invisifil thread: 100-wt. 2-ply polyester. My takeaway from her Crazy About Curves class was to turn narrow seams on the top layer and blind stitch from the top (although I recall using nylon monofilament at the time.)

Curve Quilt detail

Tight and gentle curves  and some straight sections are all needed. Most of mine are mid-range radius. More curve variation would help.

I thought Sherri Lynn meant to assign a specific mood to each single color based on how one felt that day. I chose these colors but felt the mood assignment was artificial. Anyway, here's my explanation:
  1. red - energy
  2. coral - happy
  3. orange - annoyed
  4. green - health
  5. white - tired/sleepy
  6. blue - peaceful
  7. yellow - questioning
Upon re-reading her post I realized her moods are more general, covering a section of values and shades rather than an individual color. This makes more sense to me; a group of values conveys my mood more than an individual color. 

There is very little yellow in my stash. Rather than buy fabric I removed that color. Then I used a bit of each of the remaining colors and sewed some curves. The curves are too ambiguous. If all the colors are in each curve, it's hard to distinguish one curve from another. So I switched to smaller groups of two to four colors. Each color can have one or more fabrics. This is working better.

It's obvious in the photo below which curves were sewn first and which were sewn later. I also decided I needed a new, discrete section rather than having everything unfold from a single center. That's how the Q appeared in the bottom right. It may be too disconnected from the rest; we'll see.

Curve Quilt in Progress

Every time I add a curve, the quilt gets bigger. It's a bit like children - we keep them once they arrive. :-) I don't want to trim any of them away but I don't want a large quilt. Continually adding curves is not helping me square it up. Perhaps I should piece strips in straight-ish sections to finish it out. Another point to ponder.

The technical points are starting to pile up. I'm deliberately not looking at anyone else's postings again until mine is sewn in order to see how I work this out. It will be fun to compare later. And having completed one, I'll have a better understanding of how and why others made their decisions.

Enjoy the day!
Ann

Tuesday, December 2, 2014

And That's What Happened to the Comments

I'm very grateful to Google for giving me a free Blogger account. In general it's been easy to use. Occasionally I've added some html and some buttons.

I don't have many followers; I'm not trying to make money; I simply wanted a new way to connect with people who share my interests rather than being limited to a guild. Blogging gives me a small platform, flexibility in the length, frequency and amount of my writings with time to think before I publish. There's a way for me to quickly link to sites I like to read as well as a way for people to respond to my posts. I think of it as a modern combination of a diary and letters to friends. Reading comments and recent posts on blogs I follow has become part of my routine.

But I remain grateful to Google for this opportunity. So I've tried to repay them by trying out new features they publish. Just after I started my blog they came out with new templates and I switched to one. Not that I cared that much but it seemed a good way to give them more test subjects. About a year ago they suggested linking Blogger to Google+ and I went along with that. I lost some comments when I linked them. It didn't make me happy but I thought I was doing the right thing to help the company that helped me. But with that link I became a No Reply Blogger when commenting on other sites. Not what I wanted.

So I unlinked the accounts and thought that was done. Wrongo. BEFORE unlinking the accounts, I should have to gone into Google+ setting and unchecked the box to use Google+ comments. (It turns on automatically when you link the two but must be manually turned off.) Only after that is done will returning to the old Blogger profile have a real effect. See the post by PeggyK in Google's product forum here for a better explanation.

The downside is all previous comments on my blog have disappeared. Again. Somehow they were linked to Google+ and not to my blog. How sad. Some of the discussions we had in the comments section were better than the original post. It was like losing letters in a fire - there is no recovery.

I think things are set so you can now comment without being on Google+. I refuse to sign in on other platforms to leave comments and didn't realize I had this relic on my site. I'm so sorry all the old connections were lost but hopefully this will work equitably for us all in the future.

Enjoy the day, Ann

Friday, November 28, 2014

Curve Quilt

I finally have a few days to quilt! Although several projects are basted I'm not in the mood. Instead, I want to make a curve piece scrap quilt. Sherry Lynn Wood showed some when she spoke at our guild. She also has instructions on her website. Look for the Mod Mood Quilt button on the side. Other people have posted theirs on her Facebook group, Improv Handbook for Modern Quilters. In particular, Sue Kelly posted an interesting photo and explains more in her blog, Sizzlewaggle.

Since I don't have many solids, mine will look quite different. That's ok with me. Here's what I finished today. There's one green solid and a tiny bit of hand-dyed coral, pink and blue. I'm now officially out of solid.

Curve Piece Strip quilt

First I pulled some fabric.

First fabric pull

Then I culled it.

Starting fabrics

The colors in this set were too limited so I added a few fabrics back in. I cut 6.5" widths then subcut into wedges.

Enjoy the day, Ann

Sunday, November 23, 2014

SFO Museum - A Hidden Gem

San Francisco airport (SFO) is one of my favorite places. There's always an exhibit on the walkways to the terminal. The first time we flew in I thought it was a special event; the long walkway was turned into a museum with eye-level displays of sewing machines! What could be more exciting. One-hundred years of history of the sewing machine. My husband was very patient while I read each and every card.

Since then I've seen the history of the television, automatons, Japanese toys, lace, and artwork from recycled materials. What a mix. They were all so excellent that I realized the airport must have a curator. Not just that, I discovered the SFO Museum in the International terminal. It's closed Saturdays but since it's before security, you don't need an airline ticket to visit. And this terminal has several large exhibit spaces you easily spend a couple of hours viewing. Plan to arrive extra-early for your flight so you can enjoy their next exhibits.

Pop Art Music Posters from San Francisco
 
This time there were exhibits of Rock and Roll Postersworks from Tiffany and a small case with 1960's pop-art clothing. What a mix! The photos in the links are much better than mine.

Pop Art clothing from the 60's

Tiffany lamp

I can't wait for another trip!

Enjoy the day, Ann

Sunday, November 16, 2014

Many More Aprons

I haven't been quilting much lately but I finished these aprons. They are gifts for friends. It was fun combining different fabrics to fit their future owners' personalities.

Sixteen half-aprons

A few of them have loops on the waistband for holding kitchen towels. Best view is bottom row, second from right. I made it from a strip about 1.5" by 12" or so. Double fold like bias tape, then topstitch. Pin the ends 6-8" apart on the waistband and put a towel through it to see how much to adjust the length. The towel pulls the loop down.

Enjoy the day, Ann

Wednesday, November 12, 2014

Round Robin Improvisational Quilt Results Posted

Remember the Round Robin Improv class I took with Sherri Lynn Wood? As usual, I didn't have my camera. But Sherri did and posted the photos on her blog. (https://daintytime.net/2014/09/25/improv-valley-association/)Take a look.

None of the additions were borders, as usually happens with a Round Robin. Instead we tried to "expand the conversation" for each quilt we worked on. I still enjoy seeing the sections I added to these quilts.

My Round Robin Improv quilt

I've appliqued a few more circles on this top. It's ready to sandwich and quilt. But that may not happen till after the New Year.

Enjoy the day! Ann

Sunday, November 9, 2014

NASA Ames Open House and Hangar One

Last month, for the first time in seventeen years, NASA Ames had an Open House. Many scientists were on hand encouraging youngsters to study space science by discussing projects like SOFIA , an airborne observatory. Basically a telescope in a 747,  SOFIA makes more accurate observations than any ground-based telescope.

A blimp base built on the site in 193 is in the process of being rebuilt. Every time we fly into San Francisco we see this building. It's also part of the setting for Here Comes the Navy, a 1934 James Cagney movie. I was determined to finally go inside.

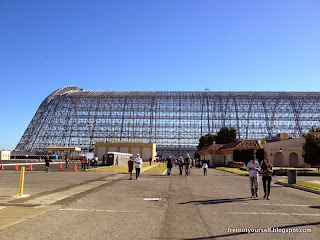
Northern end of the metal skeletal structure of Hangar One.
View of Hangar One.

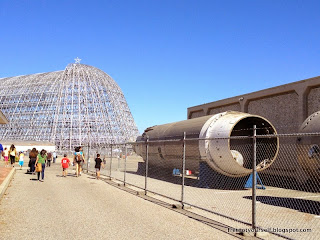
The metal skeletal structure of Hangar One with a star on top of the building.
View of Hangar One with sections of a Titan rocket.

The metal skeletal support structure of Hangar One is visible from inside the Hangar.
Inside Hangar One. This is less than half the structure.

Mission accomplished!

Enjoy the day, Ann

Wednesday, November 5, 2014

Coit Tower and the Filbert Street Steps

Coit Tower is one of my favorite places to visit. It sits on top of Telegraph Hill where a semaphore telegraph was established in the 1850's to give townspeople notice of arriving ships.

Statue of Christopher Columbus
stands in front of Coit Tower

It still has the best views of the city and bay.

The Bay Bridge framed by trees at Coit Tower.

However, twenty-seven frescoes of 1930's California life are the outstanding features of Coit Tower. They were created by a group of artists through a Depression-era work program. 

Victor Arnautoff painted City Life. The collaged scenes include a mailman, a newsstand, a holdup, an accident and, in a nod to Lillie Hitchcock Coit, her favorite #5 fire truck. 

City Life by Victor Arnautoff

Three more artists created these scenes. The Tower's deep, angled window embrasures were used in a variety of ways. Mr. Zakheim created bookcases in his. I especially liked how Ms. Scheuer painted the four-color method of printing the Sunday comics in hers.

Library by Bernard Zakheim,
Newsgathering by Suzanne Scheuer and
 Surveyor by Clifford Wright.
 
This is part of a large wall of California agriculture. Don't you love the beach pajamas of one flower picker?

California by Maxine Albro
depicts many of their crops.

The previous murals are on the main floor, but one of the delightful secrets of Coit Tower is the murals in the staircase and second floor. These are only visible if you take a City Guides Walking Tour so plan accordingly. 

Lucien Labaudt painted Powell Street on the circular staircase. Since he was a dress and costume designer, his figures are all stylishly clothed. What a treat for those of us who love fabric.

Powell Street by Lucien Labaudt 
covers both sides of the circular staircase.

All the sports of the day are included in Parker Hall's mural - even a Stanford/Cal Berkeley football game over the doorway (which is only partially visible here.) 
Collegiate Life by Parker Hall 
with a portion of Lucien Labaudt's Powell Street.

Finally, my absolute favorite are these scenes of Home Life by Jane Berlandina. The other frescoes are painted buono (wet) but Ms. Berlandina painted her room secco (dry) with egg tempera in a very limited palette of dark red, brown and chartreuse with white outlines.

Home Life: Living Room
by Jane Berlandina

Although there are buses, the best way to get to Coit Tower is to climb the intimidating Filbert Street Steps.

The base of the Filbert Street Steps.
Some are wooden and others are concrete.

They are certainly long but there are several landings where you can rest and enjoy the many flowers, shrubs, birds and views.

Roses and calla lilies
on the Filbert Street Steps.

 Enjoy the day,
Ann

Friday, October 31, 2014

Art Supply Roll-up Cases

After attending a watercolor class I decided to make a carrying case for some of my watercolor pens, pencils and brushes. I made three. (My mother would be so proud! She always insisted each dress should be made three times to get all the details correct.)

Three cases - red, green and pink - with slots for pens, pencils and brushes.
Roll-up cases for watercolor and sketching supplies

I measured and counted my supplies to make sure the pockets were the correct size. Because of the many watercolor pens my case is 9" by 25" with most pockets about one-inch wide. Originally I made them wider but found the pens slipped out. Narrower spaces grip the pencils better. My third case has three wider pockets to hold other tools such as erasers, rags and a watercolor set.

It takes three rectangles 10" by 26": one for the outside, one for the inside then fold the third in half lengthwise to create the inner pockets. The red one has thin batting and binding. The other two have fusible interfacing on both sides. I sewed and turned them then finished with narrow topstitching. That's my favorite style. Just be careful not to iron until it's turned and lined up properly.

I sewed the pockets after turning the case and before the topstitching. They run the vertical to the nine-inch side. Measure your supplies and figure out your pen/pencil/brush height and width. Count how many you have. Make the case an inch or so taller than your longest. Make it as wide as your number of tools x tool width. As I said, I added a couple of wider pockets to put additional stuff. You'll have your own extras to plan for.

Another variation is the fold-down fabric on the top inside of the pink case that keeps the pens from sliding out. I folded it back in the photo but it will cover the tops of the pens before rolling up the case. Each case has narrow self ties. 

I take mine on my morning walk and look for something to sketch. It's working very well. 

Enjoy the day!
Ann

Wednesday, October 15, 2014

Sausalito and the Bay Model

I finally took the thirty-minute ferry ride to Sausalito. Mine left from the Ferry Building in SF but others depart near Pier 39. The ferry has two decks with indoor and outdoor seating as well as room for bicycles if you call for a reservation.

Bay Bridge and Treasure Island from the Sausalito ferry

Many tourists rent bicycles to ride through the Presidio, over the Golden Gate, down the hill to Sausalito and then take the ferry back to San Francisco rather than make the trip uphill. It was too overcast for me this day.

View of Building 64, Warden's house, Lighthouse and Main Cellhouse on Alcatraz
Alcatraz from Sausalito ferry

The ferry had good views of the Bay Bridge, Treasure and Angel Islands, Alcatraz and the Golden Gate Bridge.
View of Golden Gate Bridge under overcast skies
Golden Gate Bridge from Sausalito ferry

These two fountains were our first sight on disembarkation. Constructed by local residents in 1985 to provide water for pets and their owners, they honor Sally Stanford, a popular Sausalito mayor and former SF madam.

Water Fountain for pets and their owners
Water fountain inscribed, "Have a drink on Sally," honors former Sausalito mayor and well-connected San Francisco madam Sally Stanford.
"Have a drink on Leland" pet water fountain
Pet fountain inscribed, "Have a drink on Leland."
A few steps away, Vina del Mar Park is barely large enough to hold its three treasures. The fountain and two elephant statues (named PeeWee and Jumbo) were created from paper mache for the 1915 Panama Pacific Exposition in San Francisco and transferred here afterwards by architect William Faville. In the 1930's they were recast in concrete from molds of the originals.

Concrete fountain and elephant statue stand between palms
Fountain and elephant statues from the 1915 Panama Pacific Exposition now reside in Vina del Mar Park, Sausalito.
There were originally twelve of these elephants at the Exposition holding flagpoles rather than lights.
Concrete statue topped with a crown of street lights
One of the elephant statues in Vina del Mar Park, Sausalito. PeeWee or Jumbo?

A mile down Bridgeway is the US Corps of Engineers Bay Model Visitor Center which occupies 1.5 acres of a WWII shipyard. Built in 1957 to test a pair of proposed dams, the model was used to study environmental changes on the San Francisco Bay and Sacramento - San Joaquin Delta system from human interventions such as infilling or channel deepening or straightening. It was retired in 2000 when advances in computing power made it obsolete but remains the world's largest three-dimensional hydraulic model. Bay Area residents worked to turn it into an educational center and tourist attraction.

Curving roofline recalls the quonset hut building style of the WWII shipyard
Bay Model Visitor Center, Sausalito CA

I took the fabulous audio tour for $3 but there are Ranger guided tours, evening lectures and daytime student programs. Check the calendar here.

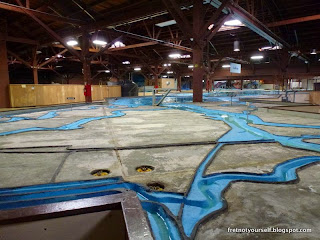
The shallow marshes and winding channels of South Bay are recreated in the Bay Model.
View of the South Bay, Bay Model.
Palo Alto is marked with a sign.

The model's horizontal scale is 1:1000 but the vertical scale is 1:100 so small copper tabs were added in the water to correct the water currents. Water is pumped from the Pacific Ocean portion of the model to raise sea level and it is allowed to drain by gravity for low tide. The tidal cycle is 14.9 minutes rather than one day so studies could be completed more efficiently. Measurements include water level, velocity, salinity and temperature.

The open waters of San Francisco Bay are recreated in the Bay Model.
View of San Francisco bay, Bay Model.
Notice the copper tabs to correct the water currents in the model.

I spent three hours here and could have spent the entire day... but hey, I'm a retired geologist. Here's a four-minute YouTube video about the Bay Model if you'd like more background.

Enjoy the day, Ann

Wednesday, September 10, 2014

Round Robin Improvisational Quilt

The Santa Clara Valley Quilt Association hosted Sherri Lynn Wood for a lecture and workshop last month and I was fortunate enough to take her class. She taught at previous QuiltCons and will again in 2015. What a wonderful teacher! We all learned so much from her unique perspective of quiltmaking. Her idea that improvisation is a score to be riffed rather than a pattern to be followed is particularly enlightening. Improv Handbook for Modern Quilters, her first book, will be available from STC Crafts early next year.

Here's my top at the end of the Improv Round Robin workshop. It started with the dark blue, dark red and grey at the bottom right. I pieced that section to open a conversation before passing it randomly to eight different quilters. Each of them combined a bit of their fabric with mine to expand the discussion. Time was very limited; Sherri repeatedly reminded us to re-center ourselves. We needed it. I've rarely been so wound up in a class. (Engrossed or involved, yes; but not wound tighter and tighter. Perhaps it was lack of sleep.)

Dark blue, dark red, grey and green fabrics were used to make this improvisational quilt.
Improv Round Robin quilt top at the end of the day

We each brought a box of "well-curated" fabrics. I just grabbed leftovers from Steam Punk along with a few pieces from the scrap bag.  Here's where I planned to start. It's probably eight yards - way too much for this project. I may be wrong but I improvise from scarcity rather than abundance.

Fabrics originally pulled to make the Improv Round Robin quilt

During our opening discussion, Sherri suggested winnowing our fabrics further and gave a range of two to one hundred fabrics. Then she said, "But no one's ever used just two." That was all the prodding necessary. I selected the dark blue and grey because each was more than 1.5 yards. The dark red was my signature fabric which I kept and added to each quilt I worked on. Sherri may have been a bit concerned about this extreme position when she suggested I add a few more fabrics with similar values. So I put the three on the right into my box also. I expected limited choices would be easier for everyone but found out it was harder. By the way, the photo above was taken before the workshop but the one below was taken after. That's all the fabric I had left.

Final fabric selection for Improv Round Robin quilt 

This quilt actually contains a fabric from eight other quilters. Oddly enough, one had a dark red while another had a dark blue that were both similar to the ones I'd used. The fabric with the large dots was a lovely addition which expanded the conversation into green and pink as well as repeating circular patterns. I really admire the way someone brought bits of blue and red into a very quiet grey section at the top. At the end of the day it looked a bit like an A-line skirt. How delightful!

When I got home I wanted to square it up but maintain the skirt view. I thought about framing it with one piece of fabric but that didn't seem true to the improvisational spirit. Instead I made a rule to use only scraps still in the box or from my scrap bag. No hunting around for more. 

Scraps of medium blue, red, white, grey and green added to the sides of an improvisational quilt.
Improv Round Robin quilt top after squaring up

Except for one, the inner border pieces on both sides were found like that and chosen because they filled the space very well. That "one" was a paper pieced section of red, green and black that didn't work in my watermelon quilt and had foundered in the scrap bag about ten years. When I put it behind the final hole it found a home. I marked it with chalk and cut it at that odd angle. I pieced the two strips that were cut from each side into the bottom. Do you see them? Don't they look wonderful?

I pinned the blue on the right side first and planned to use it on all sides. But then the red floral caught my eye. It had been used to make Steam Punk centers so it was full of holes. The dark section made it long enough. It opens and brightens the quilt as well as bringing the scale up. Now that yellow circle on the blue has friends.

The leftover circles are the final touch. I think they reinforce all the beautiful dots. And they won't languish in the scrap bag. 

Enjoy the day, Ann

Saturday, August 30, 2014

Steam Punk Back

My husband thinks Steam Punk blocks look like those old television station test patterns. I see propellers. With that in mind I drafted thirty-inch airplanes to fly across the back. Of course they are made with leftovers from this project and bits from the scrap bag.

Planes of leftovers for the quilt back

It's amazing how hard accuracy is with such large blocks. They are bigger than my cutting mat and ruler. All these years I thought small blocks were more difficult.

Here are my sketches on graph paper. The airplane is fifteen grid lines across so I simply scaled each as two inches to create a thirty-inch block. You could multiply by a different scalar for another size.

Two sketches for back blocks:
Airplane or Old TV

Don't the blades of that Steam Punk block (in the first photo) remind you of the Polyphemus moth? It didn't fit in the top and doesn't seem like a good addition to the back either. Perhaps it will make a baby quilt. (I need another project like a hole in the head.)

Enjoy the day, Ann